
Hi I'm Vera, I have two daughters who love dressing up but hate having their hair done. They will accept scrunchies though and my 5 year old daughter especially loves them. She has thick curly hair so scrunchies really are the best choice in taming her hair into a ponytail and guaranteeing an easy removal ( without her hair getting super tangled in the hair tie).
When Dahlia came out for testing I knew I had to make scrunchies and headbands to tie it on. I have made so many Dahlia’s already and it’s just so perfect on a scrunchie. It’s also great on headbands, so much so that I made myself a few for those bad hair days. Today I will be showing you how to sew up a DIY scrunchie or headband.
The steps for making headbands and scrunchies are exactly the same. The only difference is the measurements of the pieces. Both take max 10 minutes to make and make the perfect accessory for your latest Sunflower Seams creations. These are also great scrap busters!
Step 1. Cut:
For a scrunchie:
- 4”x22” strip of fabric (if you want it less bulky cut 3”x22”). You can use any fabric you like! Woven, knitted, cotton, polyester, linen etc. I highly recommend using satin or silk for those of you with wavy or curly hair.
- 8” of ¼ inch wide elastic. You can also use ⅛ inch wide elastic.
For the headband (adult size):
- 2.5” or 3”x34” (depending on how wide you want it to be) strip of fabric
- 18” of ⅜ inch elastic. I recommend measuring your head and cutting the elastic at 80-85% of what your head measures.
Pictured is the scrunchie. Here I have two strips, the pink is silk and the patterned one is quilting cotton. I didn’t have enough width wise so I cut two 11 inch strips and sewed them together so don’t worry if you need to do the same.


Step 2. Once you have cut your pieces start by folding one side of the fabric ¼ inch to ⅜ inches and press creating a memory crease.


Step 3. Fold the fabric with the right sides together and pin or clip. Then sew together using ¼” seam allowance.


Step 4. Using a safety pin, turn the strip inside out and press.
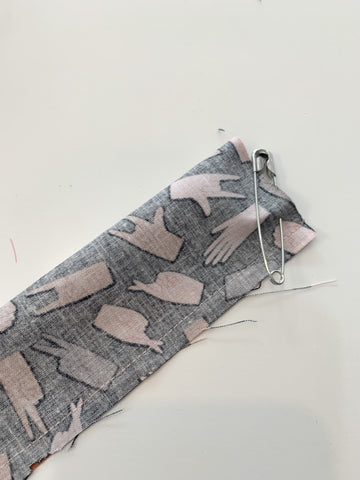


Step 5. Fold in the memory crease and thread the elastic through using a safety pin. Make sure to pin the other end to the strip to prevent it from getting lost inside.


Step 6. Pin the elastic and sew together using a zig zag stitch. If you’re making a headband you can also sew an N to secure, whichever method you’re used to using to secure the elastic. Make sure to go back and forth to secure the elastic well. Alternatively you can tie a knot to the elastic but sewing the ends together reduces bulk.


Step 7. Insert the raw end into the folded end and pin or clip together. Make sure the fabric isn’t twisted. Sew close to the edge using a straight stitch and make sure to go back and forth a few times to secure well.


Step 8. Enjoy your new scrunchie!
If you’re tying the Dahlia bow to it you can put the bow over the seam to hide it.


1 comment
Awesome!